¶ Jupyter on Wahab (Open OnDemand)
Jupyter is a popular interactive computing platform for programming languages like Python. Jupyter provides a web-based interface to interactive notebook documents, which contain a combination of Python codes, plain text and graphical output, as well as rich text documents. This tutorial is focused on Jupyter Lab, which is a rich interface for working with notebook documents. (There is also a more basic interface called Jupyter Notebook, which you may see elsewhere.) Wahab’s Open OnDemand interface provides a simple way to launch Jupyter. This step-by-step tutorial guides you to launch a Jupyter session for Python, open/create a notebook document, and working with the document.
¶ Launching a Jupyter Session
-
Go to Wahab’s Open OnDemand interface and login with your MIDAS ID and password: https://ondemand.wahab.hpc.odu.edu/ .
-
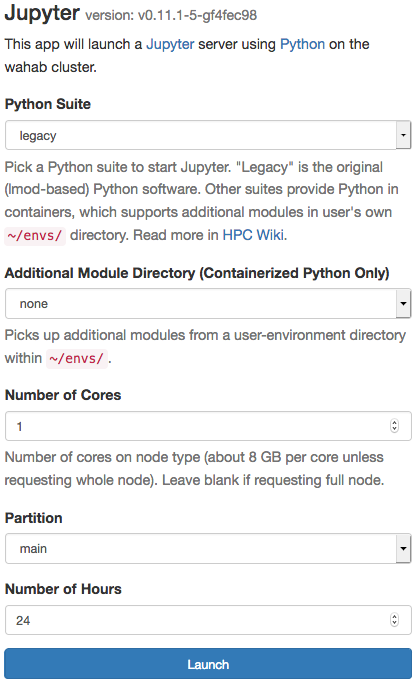
Click on the Jupyter icon from the “Interactive Apps” drop-down menu at the top of the page. You will see a web page with the following form:

Please carefully select the options to match your computing requirements.
¶ Selecting Python Suite
There are several variants of Python suites (distributions) that you can use under Jupyter. We currently provide a few of these:
-
"legacy": the original Python 3.7 installation on Wahab, using the classic
lmodmodule system. Additional software can be loaded inside the notebook using:module("load", "MODULENAME")Do this step before you
importthese modules into the notebook. -
"Tensorflow + Torch" suites: There are several variants of the suites providing Tensorflow 1.x or 2.x (both also contain pytorch 1.3), targeted for running on CPU or GPU. Pick the one that is most suitable to you.
With the exception of the "legacy" suite, all other Python suites are packaged as Singularity containers. These containers contain some of the popular packages such as: numpy, scipy, pandas, scikit-learn, tensorflow, and pytorch. Please see our Python documentation if you'd like to know more about our containerized Python software.
¶ Jupyter and GPU's
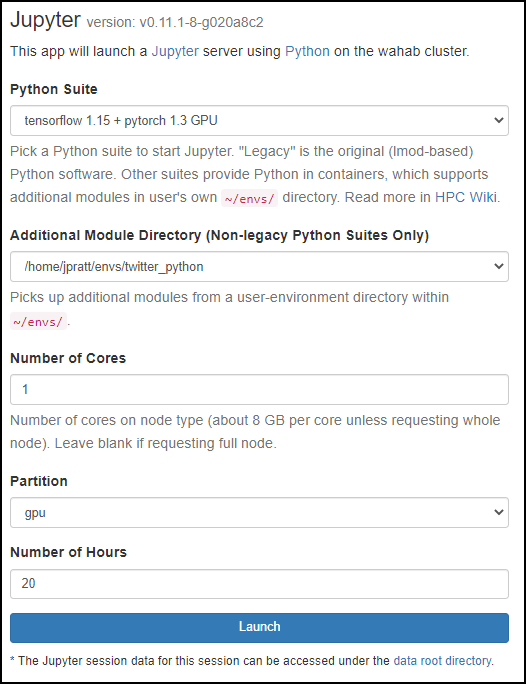
Jupyter Notebook can also be used with GPU's. When you create your Jupyter interactive session:
- Choose the appropriate suite with "GPU" in the title (ex.
tensorflow 1.15 + pytorch 1.3 GPU). - Choose
gpufor Partition.
Here is an example:

¶ Additional Modules
For the containerized Python, you have the option to load one of your custom software environment in order to use the additional Python modules required for your computation.
You will need to create this software environment prior to launching the Jupyter session. Please visit our Python documentation to learn how to do this.
This option does not apply for "Legacy" Python suite. The legacy suite uses the classic environment modules to make additional modules available for your session.
¶ Number of Cores
This is the number of CPU cores requested for your session. Start with one core, unless you know ahead of time that you can use more cores to speed up your calculations. The maximum number of cores you can request is 40, which is the number of cores on a single node on Wahab.
¶ Number of Hours
A Jupyter session will last for the duration of time determined when you launch the session (the Number of Hours in the screenshot above). In case your connection to Open OnDemand was interrupted (e.g. timeout), the session is still alive until the specified number of hours has passed. You can log back in to Open OnDemand to find your active sessions and reconnect.
¶ Frequently Asked Questions
Q: Help! I need to have lots of data to process! (Or: I need more than 24 hours to run my calculations!)
Please see this Q&A in our user forum:
https://forum.hpc.odu.edu/t/how-can-i-complete-a-jupyter-notebook-that-requires-more-than-24-hours-to-complete/90
Q: I want to use Jupyter on my own local machine, can I get that?
For these questions and more, please look at our Python: Beyond Jupyter documentation page.